

How to add a site review forms on WordPress
If you run a WordPress website, one of the most powerful ways to build trust with new visitors is by displaying genuine reviews and testimonials. Whether you own an online store, a service-based business, a portfolio site, or a blog, showing real feedback from real users can significantly boost your credibility and conversion rates.
In this comprehensive guide, you will learn exactly how to add site reviews in WordPress and how to create a testimonial page in WordPress — even if you have zero technical experience. We will walk through multiple methods, including using free plugins, premium tools, and even manual shortcodes, so you can choose the approach that works best for your site.
Let’s get started.
Why Reviews and Testimonials Matter for Your WordPress Site
Before diving into the technical steps, it is important to understand why reviews and testimonials are so essential:
- They build social proof. When potential customers see that others have had positive experiences, they are far more likely to trust your brand.
- They improve SEO. Fresh, user-generated content in the form of reviews can signal activity to search engines, potentially improving your rankings.
- They increase conversions. Studies consistently show that websites with visible testimonials convert significantly better than those without.
- They create community. Allowing users to leave reviews invites engagement and makes your site feel alive and trustworthy.
Now that you understand the value, let’s look at the different ways to add reviews and testimonials to your WordPress site.
Method 1: Using the Site Reviews Plugin (Free & Powerful)
The Site Reviews plugin is one of the most popular and feature-rich free plugins available for adding Google-style star ratings and reviews to WordPress.
Step 1: Install the Site Reviews Plugin
- Log in to your WordPress Dashboard.
- Navigate to Plugins → Add New.
- In the search bar, type “Site Reviews”.
- Find the plugin by Paul Ryley and click Install Now.
- Once installed, click Activate.

After activation, you will see a new Site Reviews menu item in your dashboard sidebar.
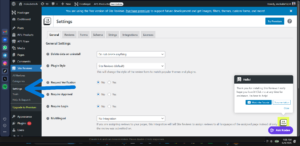
Step 2: Configure Basic Settings
- Click on Site Reviews → Settings.
- Under the General tab, configure options such as:
- Require login to submit a review (recommended for spam prevention)
- Require approval before publishing (highly recommended)
- Notification emails so you are alerted when a new review is submitted
- Click Save Changes.
Step 3:
- Go to Pages → Add New.
- Give your page a title, such as “Customer Reviews” or “What Our Clients Say”.
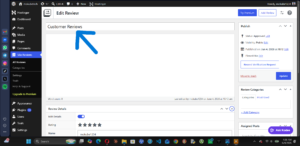
3.In the content editor (Gutenberg or Classic), add the following shortcodes:
To display the review submission form:
[site-reviews-form]To display existing reviews:
[site-reviews]
To display the overall rating summary:
[site-reviews-summary]- You can combine all three on the same page for a complete review experience.
- Click Publish.
Step 4: Assign Reviews to Specific Posts or Pages (Optional)
Site Reviews allows you to assign reviews to specific posts, products, or pages. This is especially useful for WooCommerce product reviews or service-specific feedback.
Simply add the assigned_posts attribute to your shortcode:
[site-reviews assigned_posts="post_id"][site-reviews-form assigned_posts="post_id"]Replace post_id with the actual ID of your post or page.
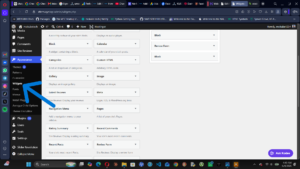
Step 5: Display Reviews in a Widget
- Go to Appearance → Widgets.
- Find the Site Reviews widget block.
- Drag it to your preferred sidebar or footer area.
- Configure the widget settings and click Save.
Method 2: Adding Testimonials Using a Dedicated Testimonials Plugin
If you want a more visual and stylized testimonial display — rather than a Google-review style layout — a dedicated testimonials plugin may be the better choice.
Recommended Plugin: Strong Testimonials
Strong Testimonials is a highly rated, free WordPress plugin that gives you full control over how testimonials are displayed.
Step 1: Install Strong Testimonials
- Go to Plugins → Add New.
- Search for “Strong Testimonials”.
- Click Install Now, then Activate.
Step 2: Add Your First Testimonial
- In your dashboard, go to Testimonials → Add New.
- Fill in the following fields:
- Title – The name of the reviewer (e.g., “Sarah Johnson”)
- Content – The testimonial text itself
- Custom Fields – Company name, position, location, rating, etc.
- Featured Image – Upload the reviewer’s photo for a personal touch
- Click Publish.
Repeat this process for each testimonial you want to add.
Step 3: Create a Testimonial View
- Navigate to Testimonials → Views.
- Click Add New.
- Choose your preferred display style:
- Grid – Display testimonials in a responsive column layout
- Slideshow – Rotate testimonials automatically
- List – A traditional stacked layout
- Customize the template, colors, and fields to match your brand.
- Click Save and copy the generated shortcode (e.g.,
[testimonials view="1"]).
Step 4: Embed Testimonials on a Page
- Go to Pages → Add New (or edit an existing page).
- Paste the shortcode you copied into the editor.
- Click Publish or Update.
Your testimonials will now appear beautifully formatted on that page.
Method 3: Adding Testimonials Manually Using the Gutenberg Block Editor
If you prefer not to use a plugin, WordPress’s built-in Gutenberg block editor gives you enough flexibility to create a simple, clean testimonial section manually.
Step 1: Open a Page or Post
- Go to Pages → Add New or edit an existing page.
- Click the “+” icon to add a new block.
Step 2: Use the Quote Block
- Search for and add the “Quote” block.
- Type or paste the testimonial text in the quote field.
- Add the reviewer’s name in the citation field at the bottom.
- Style it using the block’s sidebar options (background color, text size, etc.).
Step 3: Add a Columns Block for Multiple Testimonials
- Add a “Columns” block to create a grid layout.
- Inside each column, add a Quote block, an Image block (for the reviewer’s photo), and a Paragraph block for their name and title.
- Repeat across columns for each testimonial.
This method is completely free and requires no plugins, though it does require more manual effort.
Method 4: Embedding Google Reviews on Your WordPress Site
If your business already has Google Reviews, you can embed them directly on your WordPress site to maximize social proof.
Using the Widgets for Google Reviews Plugin
- Go to Plugins → Add New.
- Search for “Widgets for Google Reviews” (by Trustindex).
- Install and Activate the plugin.
- Follow the setup wizard to connect your Google Business Profile.
- Choose your preferred display layout (carousel, grid, badge, etc.).
- Copy and paste the provided shortcode onto any page or widget area.
Your live Google Reviews will now display automatically and update as new reviews come in.
How to Create a Dedicated Testimonial Page in WordPress
Once you have your reviews and testimonials set up, it is best practice to create a dedicated page for them. Here’s how to do it properly:
Step 1: Plan Your Page Structure
A well-structured testimonial page typically includes:
- A compelling headline (e.g., “What Our Customers Are Saying”)
- A brief introduction explaining why reviews matter to you
- A rating summary or average star rating
- Individual testimonial cards with photos, names, and quotes
- A call-to-action inviting visitors to leave their own review
Step 2: Create the Page
- Go to Pages → Add New.
- Add your title and write a short introduction paragraph.
- Insert your testimonials using shortcodes from your chosen plugin, or manually using Gutenberg blocks.
- Add a clear CTA button at the bottom, such as “Leave a Review” or “Share Your Experience”.
Step 3: Add the Page to Your Navigation Menu
- Go to Appearance → Menus.
- Find your newly created testimonial page in the Pages panel on the left.
- Click Add to Menu.
- Drag it to the appropriate position in your menu structure.
- Click Save Menu.
Making your testimonial page easy to find increases the chances visitors will read it — and submit their own reviews.
Best Practices for Managing Reviews and Testimonials in WordPress
Simply adding reviews to your site is a great start, but managing them properly is what separates amateur sites from professional ones. Here are some best practices to follow:
1. Always Moderate Reviews Before Publishing
Enable review moderation in your plugin settings so that you can approve or reject submissions before they go live. This protects your site from spam and inappropriate content.
2. Respond to Reviews
If your plugin allows it, consider responding to reviews publicly. This shows potential customers that you are attentive and care about feedback.
3. Use Real Photos
Testimonials with a real photo of the reviewer are far more convincing than those with a generic avatar. Encourage reviewers to submit a photo, or request permission to use their social media profile picture.
4. Keep Testimonials Current
Outdated testimonials from five or more years ago may actually hurt your credibility. Regularly refresh your testimonial page with recent reviews to show ongoing customer satisfaction.
5. Add Schema Markup for SEO
Most reputable review plugins (like Site Reviews) automatically add Review Schema markup to your pages. This can result in rich snippets — star ratings displayed directly in Google search results — which significantly improves click-through rates.
6. Avoid Fake Reviews
Never post fake testimonials. Not only is this unethical, but it can seriously damage your brand reputation if discovered, and may violate the terms of service of advertising platforms including Google AdSense.
Troubleshooting Common Issues
Reviews Not Showing on the Page
- Make sure the shortcode is entered correctly with no extra spaces.
- Check that your reviews have been approved (not left in “pending” status).
- Ensure the plugin is activated and updated to the latest version.
Star Ratings Not Displaying
- Some themes override plugin styles. Try switching to a default WordPress theme temporarily to see if the issue is theme-related.
- Check if a caching plugin is serving an older version of the page. Clear your cache after making changes.
Form Not Submitting
- Check if you have spam protection (like reCAPTCHA) configured correctly.
- Make sure your WordPress site can send emails (test using the WP Mail SMTP plugin).
- Disable conflicting plugins one by one to identify any compatibility issues.
Frequently Asked Questions (FAQs)
Q: Can I add reviews to a WordPress site without a plugin? Yes. You can manually add testimonials using the Gutenberg Quote block, or hard-code them into your theme template files. However, using a plugin is easier, more flexible, and saves a significant amount of time.
Q: Is the Site Reviews plugin free? Yes, Site Reviews has a robust free version. There are also premium add-ons available for additional features such as Slack notifications, Akismet spam filtering, and WooCommerce integration.
Q: Will adding reviews help my Google ranking? Reviews can contribute to SEO in multiple ways — through fresh user-generated content, increased time-on-page, and rich snippet star ratings in search results. While they are not a direct ranking factor, the indirect benefits are well-documented.
Q: Can I import reviews from other platforms like Yelp or TripAdvisor? Some premium plugins support importing reviews from third-party platforms. Alternatively, you can manually copy and paste testimonials with the reviewer’s permission.
Q: How do I prevent spam reviews? Enable moderation so all reviews must be approved before publishing. You can also require users to be logged in before submitting a review, or add Google reCAPTCHA to your review form.
For more information about the Site Reviews : How to add site Reviews in WordPress